您需要 登录 才可以下载或查看,没有账号?注册
更多精彩内容需要登录后查看
使用道具 举报
kongroom 发表于 2015-8-2 21:48 这个板子很多人都到手很多天了,我是至少到手1个多星期了,怎么说呢,问题多多,SATA口在DSM下并不能完全识 ...
nonzhe 发表于 2015-8-2 22:05 好像是的,dsm未完善。机箱不知道 哪个好 ?有没有人推荐一下
shi2818xin 发表于 2016-1-12 19:57 make -C lib/taglib 在这一步卡了 出现 make: *** lib/taglib: No such file or directory. Stop ...
本版积分规则 发表回复 回帖并转播 回帖后跳转到最后一页
0
1682
1
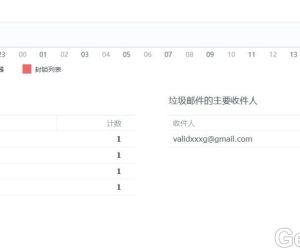 mailserverplus 破解版真不能用看图2111 人气#黑群晖
 【诚心求彩虹岛CHD邀请】本人PT经验10年以189 人气#PTer求邀
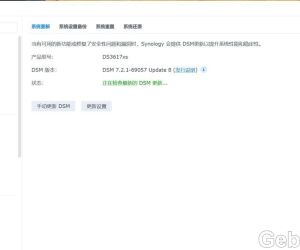 为什么DS3617xs DSM7.2.1-69057update8在安1639 人气#黑群晖
 BTSCHOOL开放注册2天322 人气#PTer交流


 提升卡
提升卡 置顶卡
置顶卡 沉默卡
沉默卡 喧嚣卡
喧嚣卡 变色卡
变色卡